
Now the next thing that comes is the Essential WordPress Plugin for Your Website Growth. You need some additional features on your blog Which by default is not found within WordPress. If we want to add any feature on our blog according to our custom requirement, then plugins are used for that. Here I will tell you about some easy to install plugins from World Press. With which you will be able to give your website the look of a professional website, on this you will not need to spend any extra money.
Plugins are used in WordPress to take the features of a website to the next level. WordPress is designed in such a way that you need a plugin to add any feature on it. WordPress to use for your blog websites is useful. I will tell you about some basic plugins here. Using which your website will look like a professional. You can use any other plugin if you want. But based on my own experience this plugin is excellent and easy to use.
Here is the WordPress Plugin list –
Let us now start installing the plugin on our WordPress website one by one. First of all we have to click on Plugins Tab in the left side menu bar.
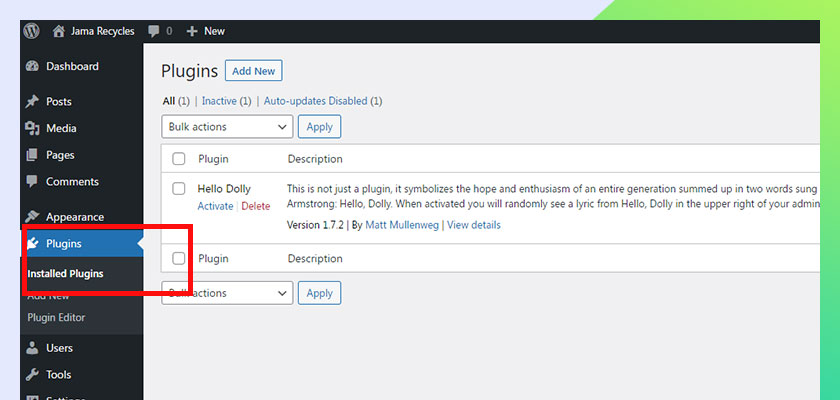
Click on Add New button

Now you can see the all available plugin section.

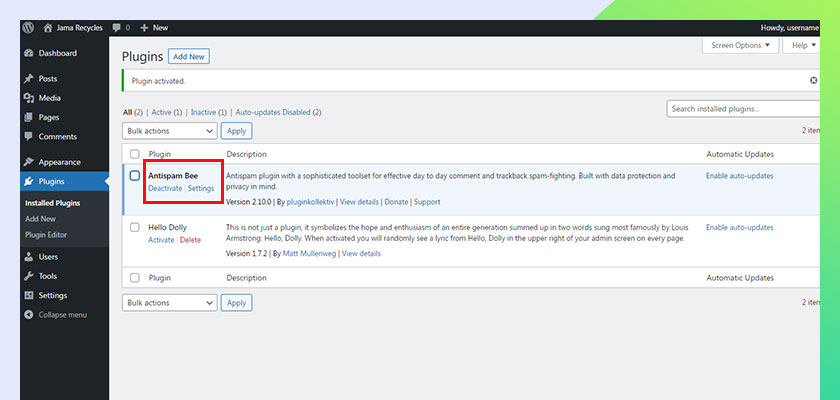
First plugin on our list is Antispam Bee. Comments and spamming are managed by this plugin. This plugin manages the spam comments on WordPress. The antispam plugin is great for day-to-day comment and trackback spam-fighting with a very nice tour set up. It has been designed keeping in mind data security and privacy.
Click on the Install button to use the plugin.

It will take few seconds to install. When installed, click on Activate button.
Your plugin is now activated and ready to work.
Second plugin in our list is Easy WP SMTP. Easy WP SMTP allows you to configure all outgoing email via SMTP server. It prevents your email from going to the Junk/Spam folder. If your account is in Gmail, Yahoo, Hotmail then you can use their SMTP server. You can deliver email to your users securely.
Like the steps mentioned above, again enter Easy WP SMTP keyword in the search bar and search. You will see the result like the screen shown below.
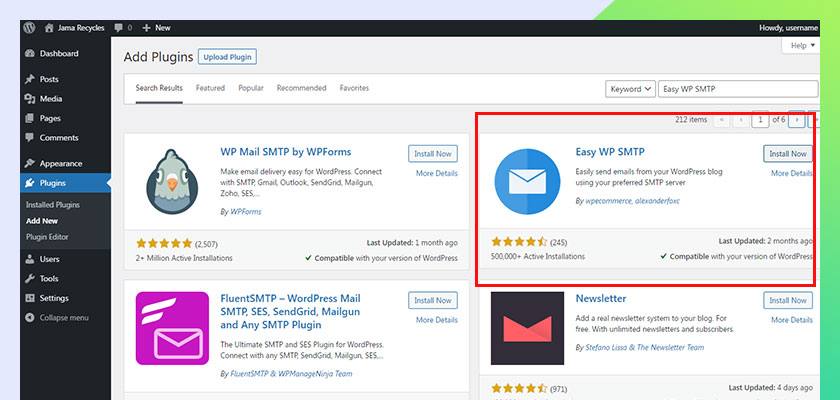
Same process as you installed the plugin earlier.
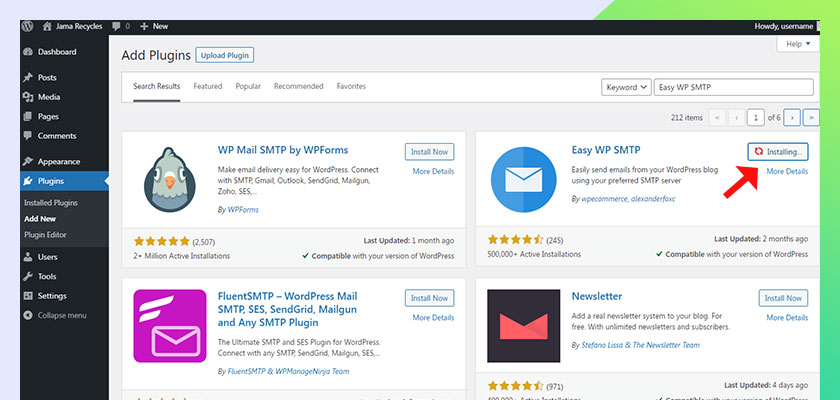
After installing click on activate.
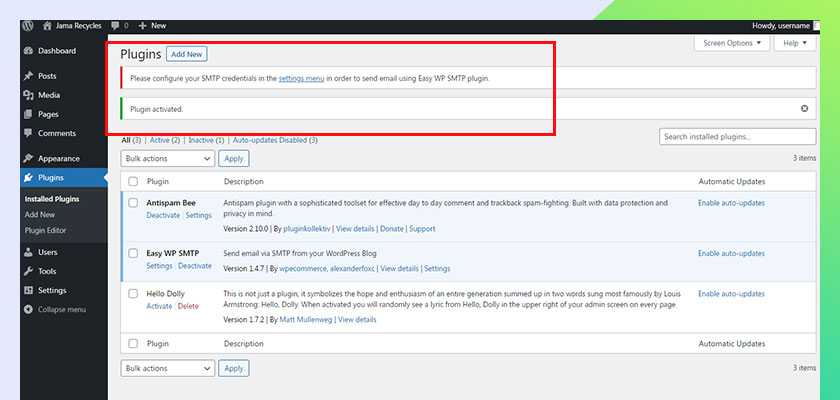
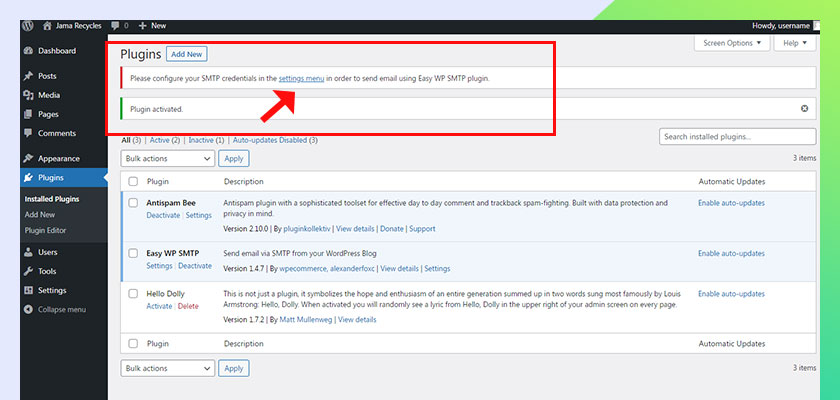
After the install is activated, you will see a message at the top which will be as follows “Please configure your SMTP credentials in the settings menu in order to send email using Easy WP SMTP plugin.” You need to make some changes in the settings of your SMTP server so that you can use this plugin better.
Here we will tell you that step. First you have to click on New in Settings.
You can request your hosting provider for the SMTP details of your website. Use the SMTP details provided by your hosting provider to configure the following settings. You’ll get the SMTP settings from your hosting provider. Don’t worry, we’ll cover this in the next section when you move your local WordPress website to Live. Because this setting will work only when your buy hosting for your website.

In the From email address field your email id will come which you have created from the hosting providers. In From Name you can keep the name of your blog and in the reply to email address which you have entered in your From email address field or this field is optional.

BCC Email Address is Optional. Your mailserver details will appear in the SMTP Host field. In Type of Encryption, check the encryption type of your server. Enter the port of the mail server in SMTP port. Enable SMTP authentication. Enter the SMTP username that you will login to your mailserver and enter its password. After filling all the details carefully click on save changes button.

You do not have to change anything in the additional settings section and go to the next tab and send Test Email.
You can use this section to send an email from your server using the above configured SMTP details to see if the email gets delivered.

In To, give the mail id in which you want to send the mail. Write some subject in the subject, write your message in the message and click on send test email.

You’ll see the message “Test email was successfully sent. No errors occurred during the process.” if nothing went wrong with your settings. So our advice to you is to provide the exact details of your SMTP server if you don’t want any errors.
You can generate inquiry form on your website or blog through Contact Form 7. Contact Form 7 is very easy and most used plugin.
You have to search the contact form 7 search box by going to the add new button.

Install and activate it like other plugins.

After activating you will see the below screen.

In contact 7 form, you get a by default form, which you have to put on your contact us page or blog sidebar section.

You can Copy this shortcode and paste it into your post, page, or text widget content. We put here as contact us page.
Go to Page > Contact. Edit the contact page. Now you see the below screen. Then click Browse all button.
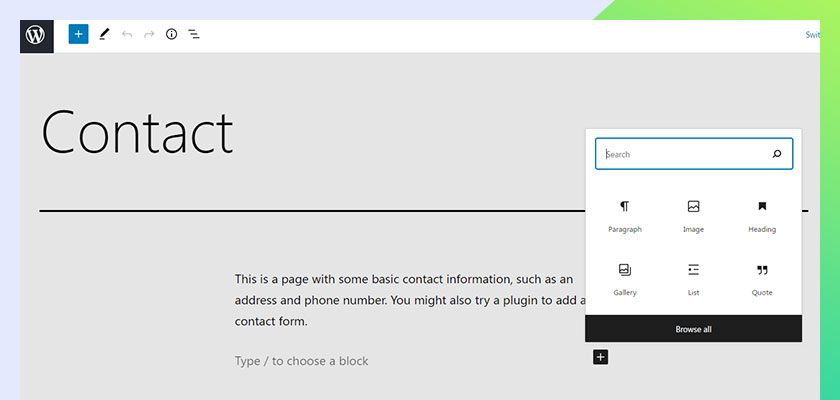
Go to left side menu section. Navigate below and you can see Shortcode Widgets. Click on it.

Paste the Contact Form 7 Short code here and update the page.
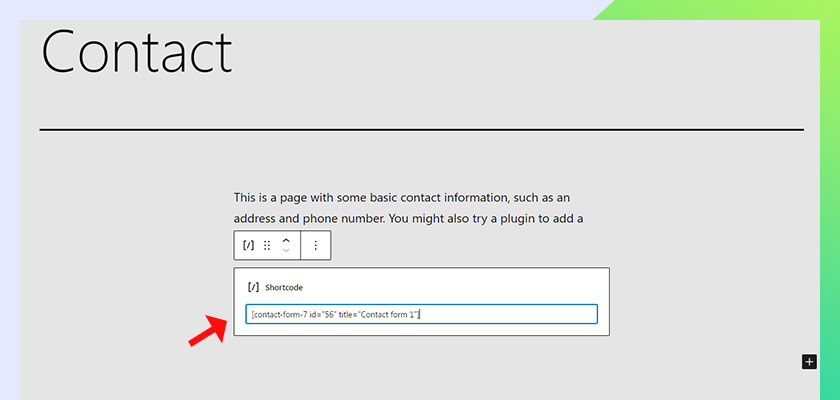
Then you view contact page. Contact Form is now ready to work on you page.

You can customize Contact Form 7 as per your requirement. Along with this, you can also put it on the side bar of your blog or any other page.
Updraft has made backup and restoration very easy. In which you can take full backup or scheduled backup to your Dropbox, Google Drive, FTP, SFTP, Email and more. UpdraftPlus makes backup and restoration very simple. This is the world’s most popular WordPress scheduled backup plugin. It currently has over three million active users. It lets you back up your files and databases in the cloud and restore with a single click!
Like any other content management system, WordPress can be prone to things like server crashes, hacking, security flaws, bad plugin or theme updates, and unsafe web hosts. If anything happens to your website unfortunately, it will cost you in terms of time, money and reputation.
You have to search the UpdraftPlus search box by going to the add new button in Plugin Menu.

Install Now & Activated the plugin.

Now it shows in Installed Plugin section. It will popup as shown in below
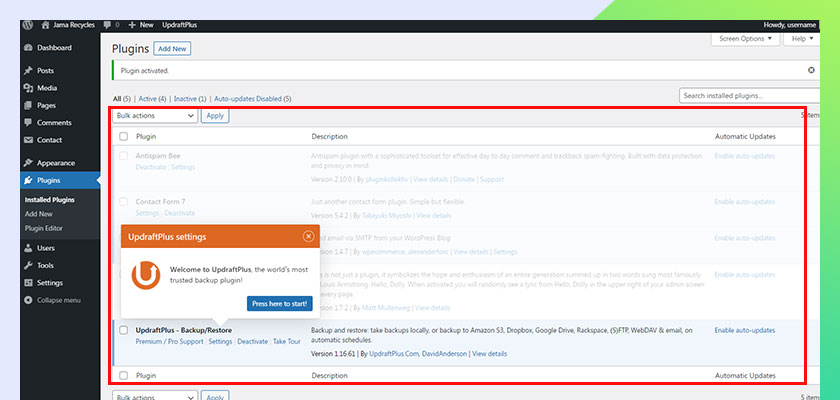
With the help of UpdraftPlus plugin, you can back up your website or blog. Can also restore from backup.
Go to Setting tab. Here you will find the drop down fields to schedule the backup of your files and databases. You can also select it daily, weekly, monthly or according to your requirement. In this you can set your remote storage. You can also select where you want to store your website backup.
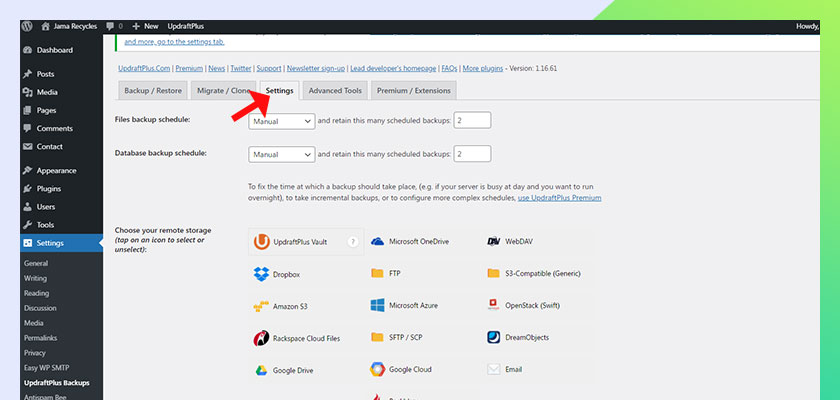
I will select Google Drive in this, you can select any option according to your choice.

After making the necessary settings, click on Save Changes. After clicking on it, you will see a pop up of Remote storage authentication.
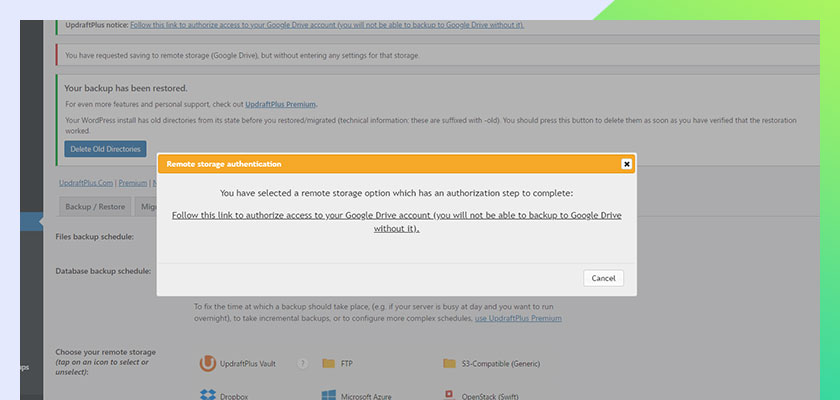
Click on the given link. This will take you to your Google Drive access. From here you allow it so that now whenever you back it up, it will keep these files on your Google Drive.

Click on Backup Now Button
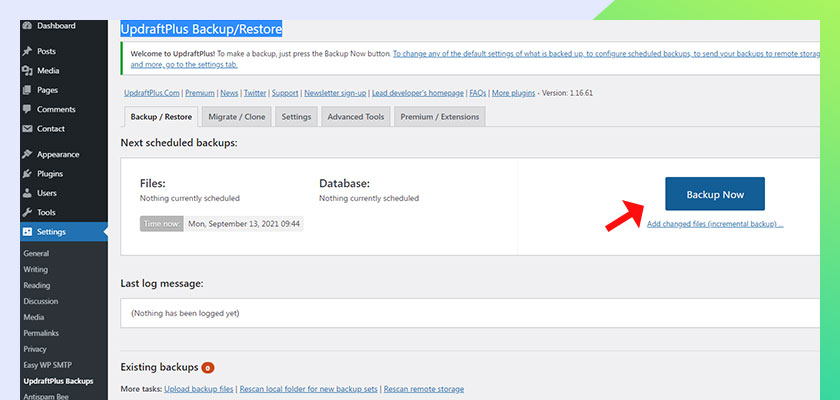
Then you will see a popup. Check the checkbox and then click Backup Now.

Now backing up your website.

In just a few seconds your website backup will be ready.

Now you can restore it anytime. It takes very less time to backup and restore using the plugin.
Now what I will tell about the WordPress Plugin is related to the most important part of website design. Which is used a lot in today’s era. Although its paid version is available, but we can run our work with the free version also. Its name is Elementor Website Builder. Elementor page builder creates pixel perfect and mobile responsive designs with drag and drop functionality. Let’s search for it and install and activate it in your website.

Install Now & activated the plugin.
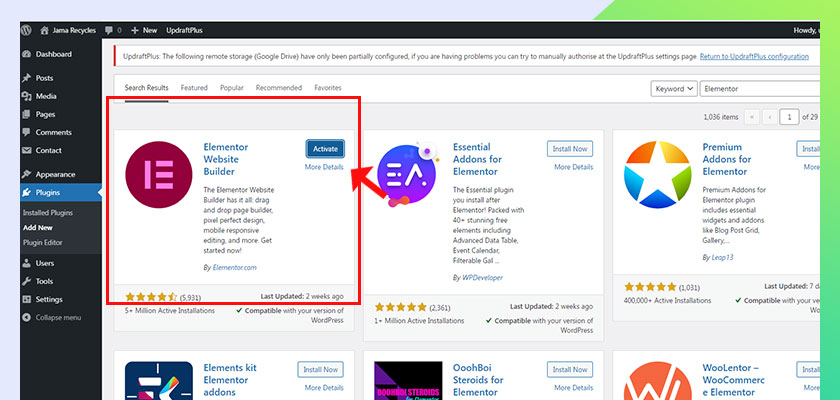
Elementor Shows all his setting to separate section of left side menu bar as shown in below figure.

Now you will be able to easily design your blog posts and page content through Elementor website builder, first of all you go to the Pages Menu. click Edit button of About page.
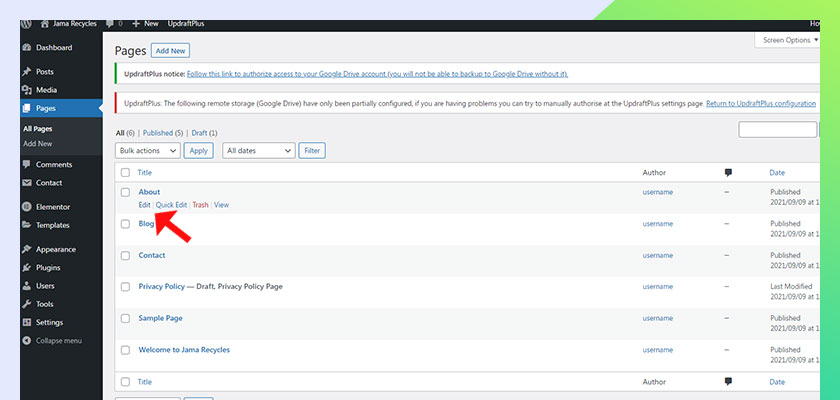
You click on Edit with Elementor button at the top.

At left Hand side you will see the Menu Section of Elementor. Elementor has 10 basic widgets. There are 21 general widgets. There are 14 WordPress widgets. With these widgets, you can design your website very easily and quickly. In addition there are 29 Pro Widgets. 16 website Widgets. There are also 20 e commerce widgets.
You check out all the widgets options one by one and at the same time turn your website into a beautiful layout.
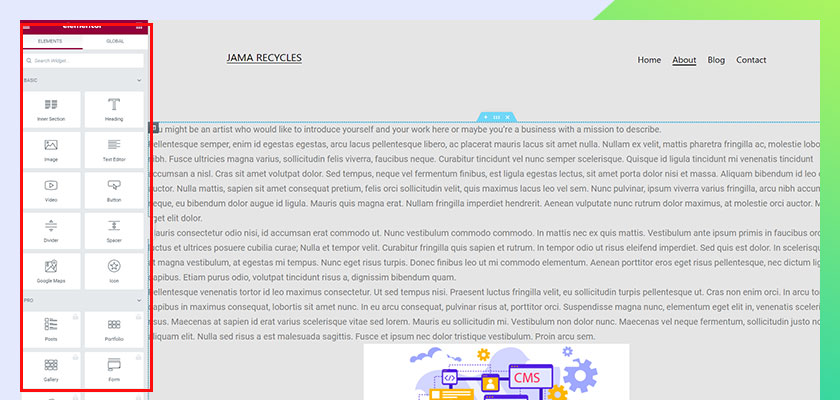
Then you see below setting tab and click to open.

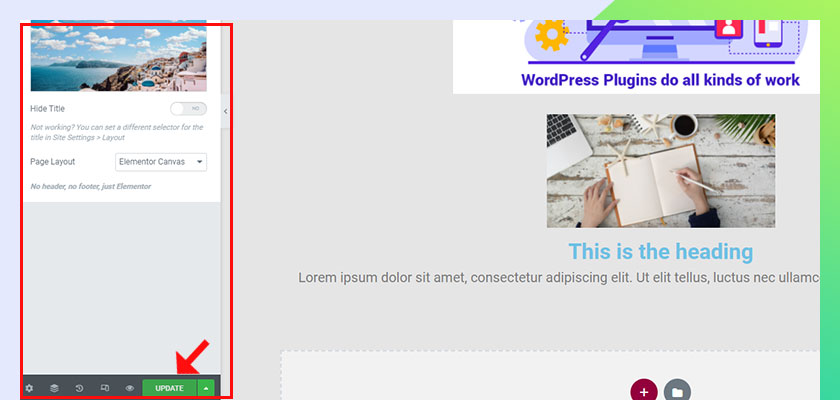
You can change page width setting to Elementor Full width, Default, Theme and Elementor Canvas.

When you set any property then at last you click the update button to save changes.
With the help of Elementor website builder, you can prepare your website in a great professional look. And you don’t even need to spend any extra money for this. Creating a website is very easy with the help of Elementor website builder. In this, without coding knowledge, the website is prepared with the help of drag and drop only.
You have given your website a beautiful design. Well written post too. The content also turned out to be great, but unless you are listed on the search engine then all this hard work is in vain. Search engine optimization is very important in today’s era. Through this you can market your website on all major search engines. It is through search engine optimization that your blog post or website is located on the pages of the search engine.
Search engine optimization is done differently on WordPress. For this you need a plugin. Although there are many search engine optimization plugins available, but as we have told you that here we will tell only about the best. Yoast SEO is a great plugin for search engine optimization. There are many features available in this for free, which is very important for our search engine optimization. Let’s install and activate Yoast SEO plugin on our website.
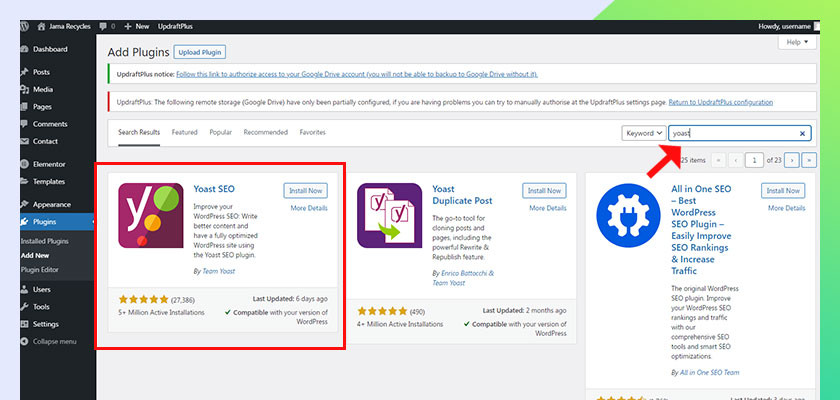
Install and Activate Yoast SEO Plugin.

When the process is complete, you will see the SEO tab in your left-side menu.
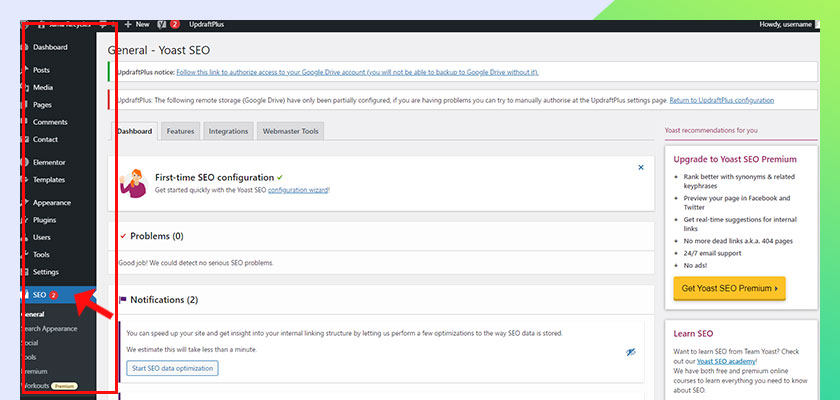
At First time it will show you the notification like “First-time SEO configuration”. Click on Yoast SEO configuration wizard.

It will open like the screen shown below

After reading thoroughly, check the check box according to your requirement and click on next, after a few steps you will see the success screen, click on close.

Your SEO configuration wizard is completed.
You can put the verification code of Google, Yahoo and Bing search engines on your website with the help of Yoast SEO plugin, so that you can track the traffic of your website. You can place breadcrumb order on your website and also use meta title, meta description, focus keyword on your pages and posts.
We will publish a new tutorial on customizing the website theme after some time. If you face any problem while doing these steps, you can discuss it by going to the comment box.