Creating a website is great for fast development locally. You can test your website by making any secure changes. It is very helpful in your business. Once you are completely satisfied with the website design, you can transfer it to the live-server. It sounds daunting but it is a simple process. Here I will tell you how to Localhost to live server WordPress migration.
To do WordPress migration to live-server, first you need WordPress hosting. If you’ve signed up with a hosting provider, that’s great. And if you are looking for a best hosting company then you should take Hostinger premium hosting for your blog which I would recommend. At present it is one of the best hosting service in the world.
First you have to design a WordPress website. For that, we have told you in our article How to create a WordPress website to install WordPress in local server XAMPP. Once you are satisfied with the design and performance of your website. You can then move it to the Live server. Know about the best and cheapest WordPress hosting providers in the world. Thus when you buy your domain name and hosting. So you can take your website live. There are main two ways to do localhost to live server WordPress migration.
Let us tell you step by step WordPress migration via manually –
To export your database, you have to go localhost/phpmyadmin/ and select your WordPress database. Then Next, click on the Export button from the top menu.

Here you will see two methods to export the database. quick and custom. If you select the custom option, it will definitely check that all the tables in that database are selected.

I am selecting the quick option here by selecting Dropdown format SQL and click on go.
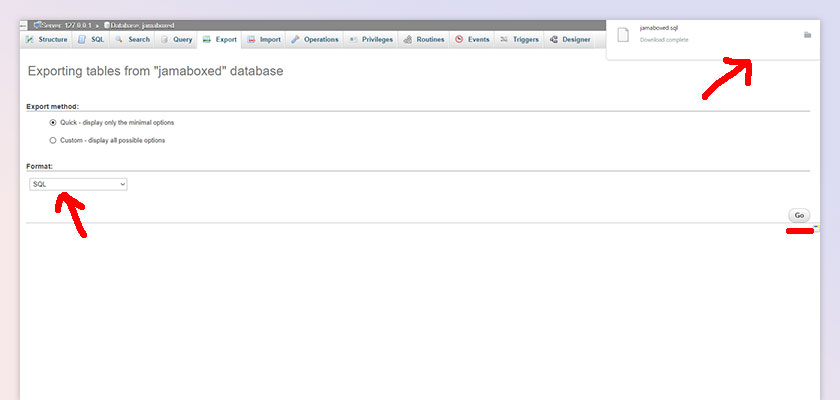
Your database file has been downloaded. Let’s moving on to the next step.
First you need to get the hosting account credentials. You can transfer your website files to the live server through the File Transfer Protocol client like FileZila or WinSCP.

If you are using a good hosting like Hostinger then you will get the option of File Manager on the Cpanel.
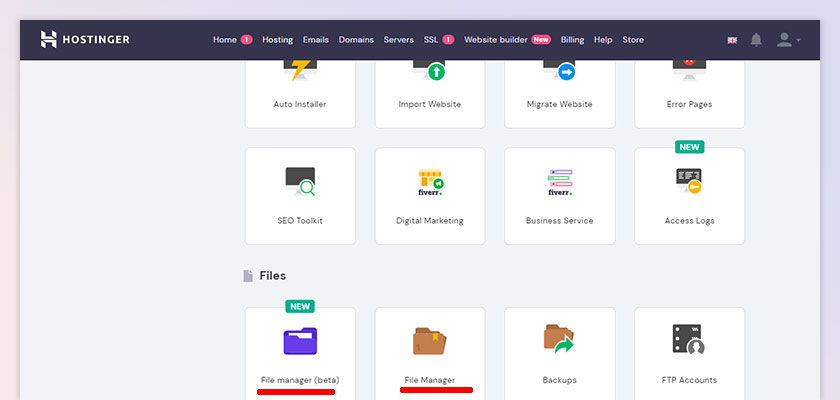
In this way, in either of the two ways, upload the files of your website to the public_html folder on the live server.

You can also upload all the files one by one, or by zipping them into a single folder.

As long as it takes time for your WordPress files to be uploaded, create a new database on your hosting server. We use the MySQL Databases section of Hosting Panel to create the database. cPanel is more handy and popular.

By clicking on MySQL Database section you will get the screen where you have to create new database. The option to create a database in the cpanel of different hosting providers may be different.
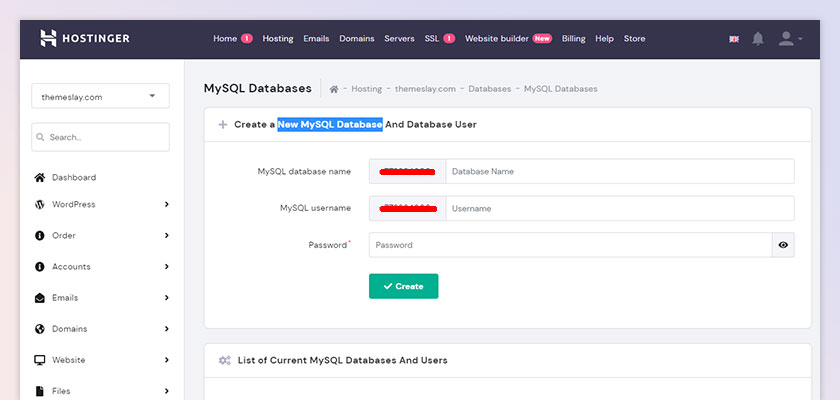
Enter the Database Name, MySQL User Name and Password and click on the Create button. Now your database is ready which will appear in the list below.
Save these details by writing them in a separate file. We will tell you later when to change it. Which will come in handy while doing live.

Now you click on Enter phpMyAdmin button given in the list which will redirect you to phpMyAdmin section.
First, open the local database file that you downloaded in the first step, in a text editor such as Notepad or Sublime. Use the Find and Replace command on Sublime.
In this file all our data which we have stored is visible. I will tell you the changes you have to make in this file.

You have created your website on localhost. Now this localhost has to be migrated to the live server. Now you have to search the name of http://localhost/websitename by press ctrl+H. It needs to be replaced with your domain name like http://my2domain.com.
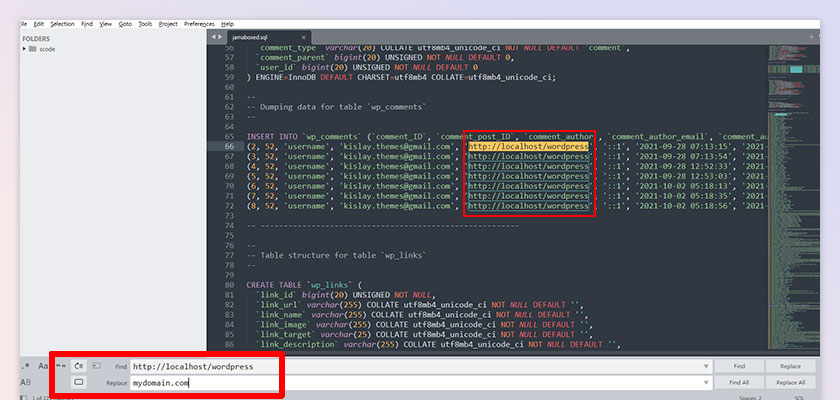
After this the file has to be changed by clicking on the Replace All button.

This process is very important, do it very carefully. If you do not do this then your live website will not be able to run. It will repeatedly redirect you to localhost. Now go to the file option and click on save. Now your file save.

Upload the database file into the live server. upload means import.
Open the MySQL section of the live server.
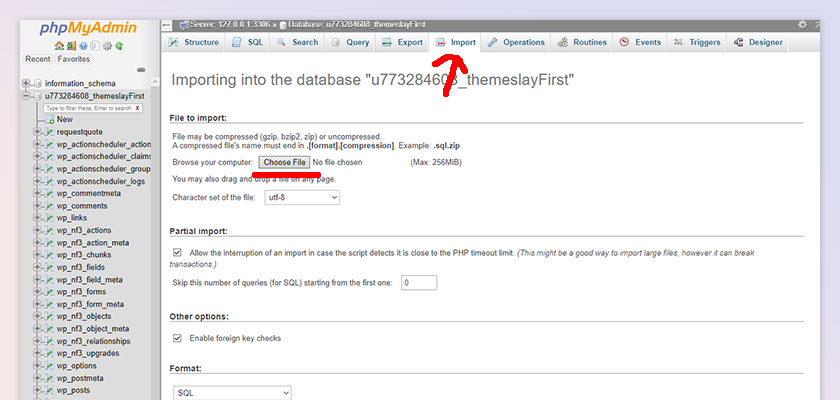
Import the database file here that you saved on your local server. Then, press Go to import your WordPress database.

It will take some time and your new database is uploaded to the live server.
Now you go to the browser and type your domain name and press enter, still your site will not be running. You don’t need to worry there are few more steps left which you have to do.
You have to go to your hosting cPanel and click on File Manager > public_html.
There are many files here. These are the same files that you uploaded to your local WordPress website. Here you have to edit the wp-config.php file.

This is the file that contains the connection to the website’s database. Open this file by right clicking on it and clicking on edit option.

You will see this file something like this

Change the DB Name, DB User and the database password here. Which you gave in the step 3 while creating the live database.
After that close the file by clicking on save and close.

Now go back to your browser and click on the refresh button. Now you will see that your website has started opening on the live domain.
Wait now, just do one more setting. You have to type s http://yourdomain.com/wp-login.php. Now you will see that your admin’s login page has been opened. Please type your admin username and password.

When you come to the dashboard of your website, you go to the Settings menu and click on the Permalinks option.

Go to the common setting of Paramalinks setting and select on plane radio button. And then click on save changes.

Selecting the plain option opens your page with the ID. After some time, you can select it again from the post name and Save Changes.When we upload the database, some things are not working properly, so it is necessary to do this option.
Refresh by going back to your browser’s address bar and checking your website’s pages one by one. Your site has been migrated to the live server.
If you don’t want to migrate your website based on above information then you can use plugin. Plugins in WordPress are meant to make things easier. You can easily migrate your website to live server using WordPress migration plugins. The website can be made live very easily using a plugin. There are many plugins available for website migration in WordPress. But here we will tell you only about the most reliable and free plugin. Let’s see about some of the best WordPress plugins.

Updraft Plus is a WordPress backup and migration plugin that currently has over 1 million active installs. It is also provides the facility to back up all the files and folders of your website as well as transfer them from one server to another.

Duplicator – WordPress Migration Plugin also currently has over 1 million active installs. This plugin also allows you to easily transfer your website from one server to another. It gives WordPress users the ability to move websites from one place to another. Along with it also works as a backup use by it.

All-in-One WP Migration Introduced in 2013 and instantly used by over 60 million websites. It is indeed one of the most trusted and used plugins for WordPress. By this the websites are taken to live pay with absolute ease. It transfers your website in very easy steps.

This (free) version is limited to a 2GB size backup. Backing up your site has never been easier! Just install the plugin, click “Create Backup Now” – Done. You can also schedule backups, eg. Define that the backup should be taken automatically every week (or every day/month). For unlimited size, please take a look at the premium plugin.

WP Staging can help you prevent your website from breaking or becoming unavailable due to installing plugin updates without testing them! This Duplicator, Staging, and Backup plugin can create an exact copy of your entire website in seconds. In this, the cloning and backup time depends on the size of your website.
This clone plugin creates a clone of your website in a subfolder or subdomain (Pro) of your main WordPress installation. A clone includes a complete copy of your database.
You saw that it is not that difficult to move a WordPress website from localhost to live. If you want to do this manually, you only have to do a few steps. And that way you won’t even have to install extra plugins. Due to which the performance of your website will not be down. But if you guys want to use it then you have complete freedom to use the plugin too. First, make your WordPress website alive and test it locally. Only after that when you are completely satisfied try to go live. Now it is in your hands which of these paths you choose.